สำหรับการ Upload ไฟล์นั้นแน่นอนว่าเกือบทุก Web Application จะต้องมีการ Upload ไฟล์ ขึ้นไปที่ Server ทั้ง Upload แบบไฟล์เดียวหรือ Upload ทีละหลายๆ ไฟล์พร้อมกัน
ในบทเรียนรู้นีเรามาทำความเข้าใจการ Upload ไฟล์ ทั้งทีอยู่ใน actionCreate actionUpdate และ actionView พร้อมทั้งระบบการลบรูปภาพออกจากระบบด้วย เพื่อเป็นแนวทางในการพัฒนา Web Application ด้วย Yii Framework 2 ต่อไป
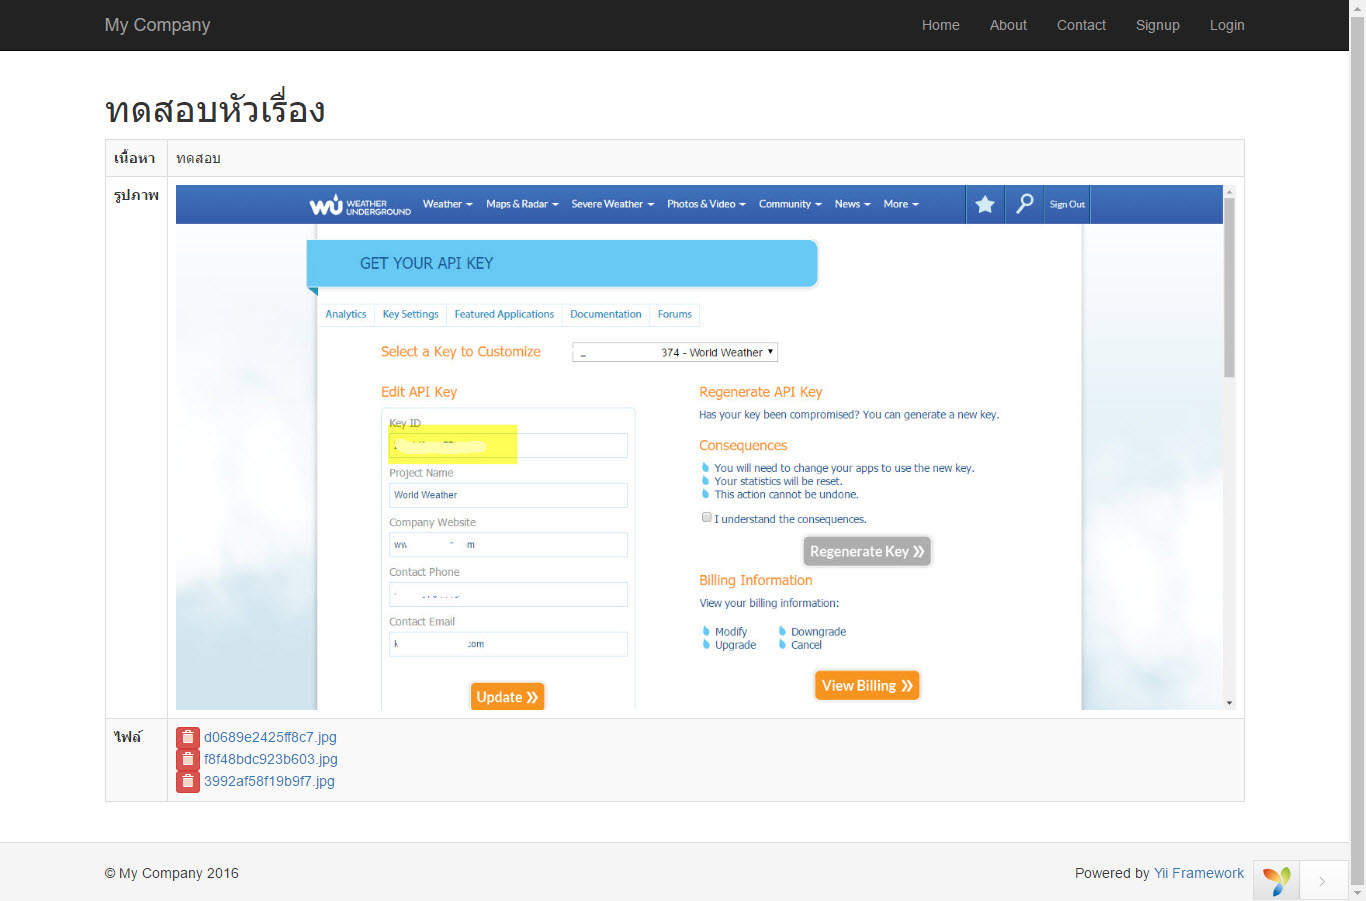
สามารถดูรายละเอียดเพิ่มเติมได้ที่ http://www.yiiframework.com/doc-2.0/guide-input-file-upload.html
โครงสร้างไฟล์ประกอบ
- frontend/controllers/UploadController.php
- frontend/models/Upload.php
- frontend/views/upload/index.php
- frontend/views/upload/create.php
- frontend/views/upload/update.php
- frontend/views/upload/view.php
- frontend/views/upload/_form.php
- frontend/web/uploads/images
- frontend/web/uploads/files
โครงสร้างตารางฐานข้อมูล
ในที่นี้จะใช้ yii migrate ในการสร้างตารางฐานข้อมูลโดยพิมพ์
yii migrate/create create_upload
จะได้ไฟล์ console/migrations/xxxxx_xxxxx_create_upload.php จากนั้นแก้ไข method up() ดังนี้
<?php

use yii\db\Migration;

/**
 * Handles the creation for table `upload`.
 */
class m160707_103419_create_upload extends Migration
{
    /**
     * @inheritdoc
     */
    public function up()
    {
        $this->createTable('upload', [
            'id' => $this->primaryKey(),
            'title' => $this->string()->notNull(),
            'content' => $this->text(),
            'image' => $this->string(),
            'files' => $this->string(),
        ]);
    }

    /**
     * @inheritdoc
     */
    public function down()
    {
        $this->dropTable('upload');
    }
}
จากนั้นทำการเรียก migration เพื่อ apply ลงฐานข้อมูลด้วยคำสั่ง
yii migrate
แล้วกด yes ก็จะได้ตาราง upload เรียบร้อยแล้ว
ขั้นตอนต่อไปให้ทำการสร้าง Model โดยจะใช้ Gii Generator ก็ได้
Upload.php
สำหรับ Model Upload เป็น Model ในการทดสอบ หากท่านไหนใช้การ Upload กับ Model อื่นๆ ก็สามารถทำได้ โดยกำหนด Attribute และ Method ต่างๆ เพิ่มเติมคือ
- $uploadImageFolder เป็นที่เก็บของรูปภาพ
- $uploadFilesFolder เป็นที่เก็บของไฟล์
<?php

namespace frontend\models;

use Yii;
use yii\helpers\ArrayHelper;
use yii\helpers\Html;

/**
 * This is the model class for table "upload".
 *
 * @property integer $id
 * @property string $title
 * @property string $content
 * @property string $image
 * @property string $files
 */
class Upload extends \yii\db\ActiveRecord
{
    public $uploadImageFolder = 'uploads/images'; //ที่เก็บรูปภาพ
    public $uploadFilesFolder = 'uploads/files'; //ที่เก็บไฟล์

    /**
     * @inheritdoc
     */
    public static function tableName()
    {
        return 'upload';
    }

    /**
     * @inheritdoc
     */
    public function rules()
    {
        return [
            [['title'], 'required'],
            [['content'], 'string'],
            [['title'], 'string', 'max' => 255],
            [['image'], 'file', 'extensions' => 'jpg, png, gif'],//กำหนดให้เป็นแบบ file
            [['files'], 'file', 'maxFiles' => 10], //กำหนดให้เป็นแบบ file ตรงนี้สามารถกำหนดนามสกุลได้นะครับ เหมือนกันกับแบบของรูปภาพ
        ];
    }

    /**
     * @inheritdoc
     */
    public function attributeLabels()
    {
        return [
            'id' => 'ID',
            'title' => 'หัวเรื่อง',
            'content' => 'เนื้อหา',
            'image' => 'รูปภาพ',
            'files' => 'ไฟล์',
        ];
    }

    /*
    * UploadImage เป็น Method ในการ upload รูปภาพในที่นี้จะ upload ได้เพียงไฟล์เดียว โดยจะ return ชื่อไฟล์
    */
    public function uploadImage(){

        if($this->validate()){
            if($this->image){
                if($this->isNewRecord){//ถ้าเป็นการเพิ่มใหม่ ให้ตั้งชื่อไฟล์ใหม่
                    $fileName = substr(md5(rand(1,1000).time()),0,15).'.'.$this->image->extension;//เลือกมา 15 อักษร .นามสกุล
                }else{//ถ้าเป็นการ update ให้ใช้ชื่อเดิม
                    $fileName = $this->getOldAttribute('image');
                }
                $this->image->saveAs(Yii::getAlias('@webroot').'/'.$this->uploadImageFolder.'/'.$fileName);

                return $fileName;
            }//end image upload
        }//end validate
        return $this->isNewRecord ? false : $this->getOldAttribute('image'); //ถ้าไม่มีการ upload ให้ใช้ข้อมูลเดิม
    }

    /*
    * UploadFiles เป็น Method ในการ upload หลายไฟล์ สูงสุด 10 ไฟล์ตามที่ได้กำหนดจาก rules() และจะ return ชื่อไฟล์ aaaa.aaa, bbbb.bbb, ....
    */
    public function uploadFiles(){
        $filesName = []; //กำหนดชื่อไฟล์ที่จะ return
        if($this->validate()){
            if($this->files){
                foreach($this->files as $file){
                    $fileName = substr(md5(rand(1,1000).time()),0,15).'.'.$file->extension;//เลือกมา 15 อักษร .นามสกุล
//$fileName = iconv('UTF-8','WINDOWS-874',$file->baseName).'.'.$file->extension; //ใช้ไฟล์ภาษาไทย
                    $file->saveAs(Yii::getAlias('@webroot').'/'.$this->uploadFilesFolder.'/'.$fileName);
                    $filesName[] = $fileName;
                }

                if($this->isNewRecord){ //ถ้าเป็นการเพิ่ม Record ใหม่ให้บันทึกไฟล์ aaa.aaa,bbb.bbb ....
                    return implode(',', $filesName);
                }else{//ถ้าเป็นการปรับปรุงให้เพิ่มจากของเดิม
                    return implode(',', ArrayHelper::merge($fileName, $this->getOldAttribute('files') ? explode(',', $this->getOldAttribute('files')) : []));
                }
            }//end files upload

        }//end validate
        return $this->isNewRecord ? false : $this->getOldAttribute('files'); //ถ้าไม่มีการ upload ให้ใช้ข้อมูลเดิม
    }

    /*
    * getImage เป็น method สำหรับเรียกที่เก็บไฟล์ เพื่อนำไปแสดงผล
    */
    public function getImage()
    {
        return Yii::getAlias('@web').'/'.$this->uploadImageFolder.'/'.$this->image;
    }
    /*
    * getFiles เป็น method สำหรับเรียกชื่อไฟล์ให้อยู่ในรูปของ array
    */
    public function getFiles()
    {
        return explode(',', $this->files);
    }

}
UploadController.php
<?php

namespace frontend\controllers;

use frontend\models\Upload;
use yii\web\UploadedFile;
use yii\data\ActiveDataProvider;
use Yii;

class UploadController extends \yii\web\Controller
{
    public function actionCreate()
    {
        $model = new Upload();

        if($model->load(Yii::$app->request->post())){

            try{
                $model->image = UploadedFile::getInstance($model, 'image');
                $model->files = UploadedFile::getInstances($model, 'files'); //upload หลายไฟล์ getInstances (เติม s)
                $model->image = $model->uploadImage(); //method return ชื่อไฟล์
                $model->files = $model->uploadFiles(); //method return ชื่อไฟล์ aaaa.aaa, bbbb.bbb, ...


                $model->save();//บันทึกข้อมูล
                /*var_dump($model);
                die();*/
                Yii::$app->session->setFlash('success', 'บันทึกข้อมูลเรียบร้อย');
                return $this->redirect(['index']);
            }catch(Exception $e){
                Yii::$app->session->setFlash('danger', 'มีข้อผิดพลาด');
                return $this->redirect(['index']);
            }
        }

        return $this->render('create', [
            'model' => $model,
        ]);
    }

    public function actionUpdate($id)
    {
        $model = $this->loadModel($id);
        if($model->load(Yii::$app->request->post())){

            try{
                $model->image = UploadedFile::getInstance($model, 'image');
                $model->files = UploadedFile::getInstances($model, 'files');//upload หลายไฟล์ getInstances (เติม s)
                $model->image = $model->uploadImage();//method return ชื่อไฟล์
                $model->files = $model->uploadFiles();//method return ชื่อไฟล์ aaaa.aaa, bbbb.bbb,


                $model->save();//บันทึกข้อมูล

                Yii::$app->session->setFlash('success', 'บันทึกข้อมูลเรียบร้อย');
                return $this->redirect(['index']);
            }catch(Exception $e){
                Yii::$app->session->setFlash('danger', 'มีข้อผิดพลาด');
                return $this->redirect(['index']);
            }
        }
        return $this->render('update', [
            'model' => $model
        ]);
    }

    public function actionView($id)
    {
        $model = $this->loadModel($id);
        return $this->render('view', [
            'model' => $model
        ]);
    }

    public function actionIndex()
    {
        $dataProvider = new ActiveDataProvider([
            'query' => Upload::find()
        ]);
        return $this->render('index', [
            'dataProvider' => $dataProvider
        ]);
    }

    public function actionDeleteFile($id, $file)
    {
        $model = $this->loadModel($id); //โหลด record ที่ต้องการมา
        try{
            $files = explode(',', $model->files); //เอาชื่อไฟล์มาแปลงเป็น array
            $files = array_diff($files, array($file)); //เอาชื่อไฟล์ที่ส่งมามาเอาออกจาก record
            unlink(Yii::getAlias('@webroot').'/'.$model->uploadFilesFolder.'/'.$file); //ลบไฟล์ออก
            $files = implode(',', $files);
            $model->files = $files;//นำไฟล์ใหม่กลับเข้า attribute
            $model->save();//บันทึกข้อมูลใหม่
            Yii::$app->session->setFlash('success', 'ลบข้อมูลเรียบร้อยแล้ว');
            return $this->redirect(['view', 'id' => $model->id]);
        }catch(Exception $e){
            Yii::$app->session->setFlash('success', 'มีข้อผิดพลาด');
            return $this->redirect(['view', 'id' => $model->id]);
        }


    }

    protected function loadModel($id)
    {
        $model = Upload::findOne($id);
        if(!$model){
            throw new \Exception("Error Processing Request", 1);
        }
        return $model;
    }

}
frontend/views/upload/create.php
<?php
$this->title = 'Upload Single and Multiple files';
?>
<h1><?php $this->title?></h1>

<?=$this->render('_form', [
    'model' => $model
])?>
frontend/views/upload/index.php
<?php
use yii\grid\GridView;
$this->title = 'Yii2 Upload Tutorial';
?>
<?=GridView::widget([
    'dataProvider' => $dataProvider,
    'columns' => [
        ['class' => 'yii\grid\SerialColumn'],
        'title',
        'content',
        'image',
        'files',
        ['class' => 'yii\grid\ActionColumn']
    ]
])?>
frontend/views/upload/update.php
<?php
$this->title = 'Upload Single and Multiple files';
?>
<h1><?php $this->title?></h1>

<?=$this->render('_form', [
    'model' => $model
])?>
frontend/views/upload/view.php
<?php
use yii\widgets\DetailView;
use yii\helpers\Html;
use yii\helpers\Url;

$this->title = $model->title;
?>
<h1><?=$this->title?></h1>

<?=DetailView::widget([
    'model' => $model,
    'attributes' => [
        'content:html',
        [
            'attribute' => 'image',
            'format' => 'raw',
            'value' => $model->image ? Html::img($model->getImage(), ['class' => 'img-responsive']) : null
        ],
        [
            'attribute' => 'files',
            'format' => 'raw',
            'value' => call_user_func(function($data){
                $files = null;
                if($data->files){
                    foreach ($data->getFiles() as $key => $value) {
                        $files .= Html::a('<i class="glyphicon glyphicon-trash"></i>', ['delete-file', 'id' => $data->id, 'file' => $value], ['class' => 'btn btn-xs btn-danger', 'data' => ['confirm' => 'แน่ใจนะว่าต้องการลบ?', 'method' => 'post']]).' '.
                        Html::a($value, Url::to(Yii::getAlias('@web').'/'.$data->uploadFilesFolder.'/'.$value), ['target' => '_blank']).'<br />';
                    }
                    return $files;
                }else{
                    return null;
                }
            },$model),
        ]
    ]
])?>
frontend/views/upload/_form.php
<?php
//หากมี fileInput form จะสร้าง enctype="multipart/form-data ให้อัตโนมัตินะ (v2.0.8)
use yii\helpers\Html;
use yii\widgets\ActiveForm;
?>
<?php $form = ActiveForm::begin()?>

<?=$form->field($model, 'title')?>

<?=$form->field($model, 'content')->textarea()?>

<?=$form->field($model, 'image')->fileInput()?>

<?=$form->field($model, 'files[]')->fileInput(['multiple' => true])//ต้องมี [] ด้วยนะเพราะหลายไฟล์เป็น array และมี multiple ด้วย?>

<?=Html::submitButton('บันทึกข้อมูล', ['class' => 'btn btn-success'])?>

<?php ActiveForm::end()?>
ตัวอย่างหน้า view
ทดลองเพิ่มการ Upload รูปแบบ Base64
สร้าง migration เพื่อเพิ่ม field โดยพิมพ์คำสั่ง
yii migrate/create add_img64_to_upload --fields="img64:text"
จะได้ไฟล์ console/migration/xxx_xxx_add_img64_to_upload.php เมื่อเปิดดูจะได้ดังนี้
<?php

use yii\db\Migration;

/**
 * Handles adding img64 to table `upload`.
 */
class m160708_055025_add_img64_to_upload extends Migration
{
    /**
     * @inheritdoc
     */
    public function up()
    {
        $this->addColumn('upload', 'img64', $this->text());
    }

    /**
     * @inheritdoc
     */
    public function down()
    {
        $this->dropColumn('upload', 'img64');
    }
}
จากนั้นพิมพ์คำสั่ง yii migrate เพื่อ apply ลงฐานข้อมูล กด yes ก็จะได้ field img64 ในตาราง upload เรียบร้อยแล้ว
ติดตั้ง JavaScript Bower package ชื่อ croppie
โดยพิมพ์คำสั่ง
bower install croppie
จากนั้นจะได้ folder vendor/bower/Croppie
สามารถดูรายละเอียด การตั้งค่า Package นี้ได้ที่
http://foliotek.github.io/Croppie/
สร้างไฟล์ UploadAsset เพื่อลงทะเบียน JS และ CSS
โดยสร้างไว้ที่ frontend/assets/UploadAsset.php
<?php

namespace frontend\assets;

use yii\web\AssetBundle;

class UploadAsset extends AssetBundle
{
    public $sourcePath = '@bower';

    public $css = [
        'Croppie/croppie.css'
    ];
    public $js = [
		'Croppie/croppie.js'
    ];
    public $depends = [
        'yii\web\YiiAsset',
        'yii\bootstrap\BootstrapAsset',
    ];
}
แก้ไข frontend/models/Upload.php
เพิ่มใน method rules() ดังนี้
[['img64'], 'string']
เพิ่มใน method attributeLabels() ดังนี้
'img64' => 'รูป'
แก้ไข frontend/views/upload/_form.php
โดยเพิ่ม ส่วนการลงทะเบียน Asset
use frontend\assets\UploadAsset;

UploadAsset::register($this);
และเพิ่มส่วนเลือกไฟล์ดังนี้
<div class="upload-demo">

    <?=Html::fileInput('upload', null, ['id' => 'upload'])?>
    <?=$form->field($model, 'img64')->hiddenInput(['id' => 'img64'])?>
    <div class="upload-msg">
        Upload a file to start cropping
    </div>
    <div id="upload-demo"></div>


</div>
และเพิ่ม CSS และ JS
<?php $this->registerCss("
.upload-demo #upload-demo,
.upload-demo .upload-result,
.upload-demo.ready .upload-msg {
    display: none;
}
.upload-demo.ready #upload-demo {
    display: block;
}
.upload-demo.ready .upload-result {
    display: inline-block;
}

.upload-msg {
    text-align: center;
    padding: 50px;
    font-size: 22px;
    color: #aaa;
    width: 260px;
    margin: 50px auto;
    border: 1px solid #aaa;
}
")?>
<?php $this->registerJs("
        var \$uploadCrop;

		function readFile(input) {
 			if (input.files && input.files[0]) {
	            var reader = new FileReader();

	            reader.onload = function (e) {
	            	\$uploadCrop.croppie('bind', {
	            		url: e.target.result
	            	});
	            	$('.upload-demo').addClass('ready');
	            }

	            reader.readAsDataURL(input.files[0]);
	        }
	        else {
		        swal(\"Sorry - you're browser doesn't support the FileReader API\");
		    }
		}

        \$uploadCrop = $('#upload-demo').croppie({
            enableExif: true,
            viewport: {
                width: 200,
                height: 200,
                type: 'square' //square, circle
            },
            boundary: {
                width: 300,
                height: 300
            }
        });
        $('#upload').on('change', function () { readFile(this); });


        $('#form-submit').on('click', function() {
            //alert( 'Handler for .submit() called.' );
            \$uploadCrop.croppie('result', {
                type: 'canvas',
                size: 'viewport'
            }).then(function (resp) {
                //alert( resp );
                $('#img64').val(resp);
            });
        });
")?>
แก้ไขไฟล์ frontend/views/upload/view.php
เพิ่มการแสดงผลรูปภาพที่ Upload
[
            'attribute' => 'img64',
            'format' => 'raw',
            'value' => $model->img64 ? Html::img($model->img64, ['class' => 'img-responsive']) : null,
        ],
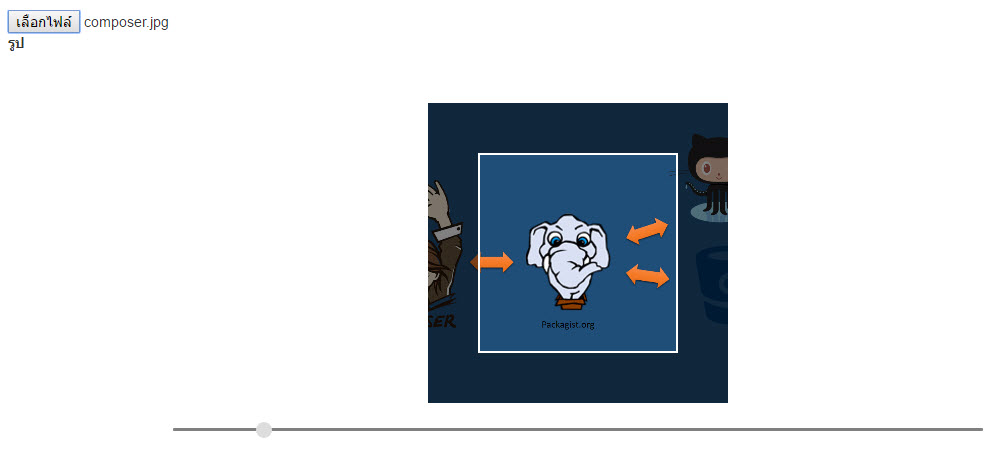
ทดสอบการทำงานจะเมื่อเลือกไฟล์จะเห็น Web Application ดังนี้
เมื่อ upload รูปจะปรากฏ base64 image ในฐานข้อมูลดังนี้

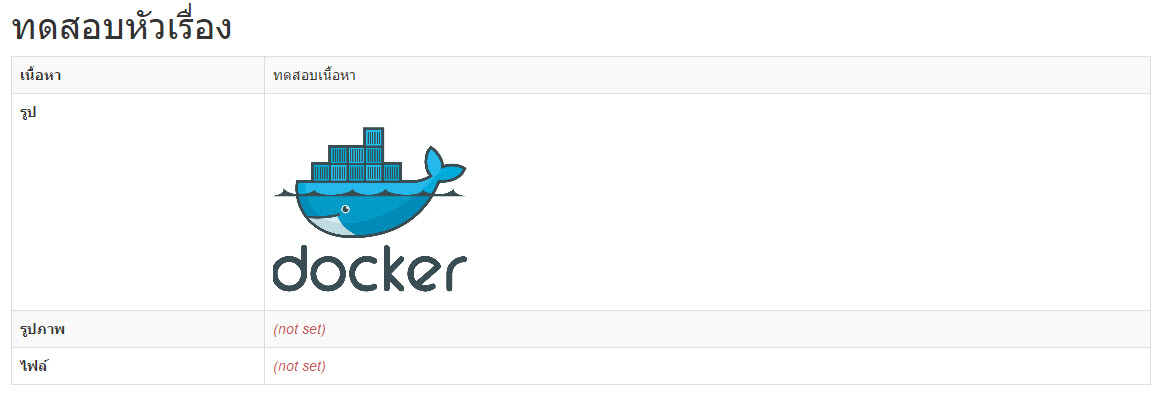
เมื่อเปิดดู view จะเห็นลักษณะนี้


ความคิดเห็น