ใน Part 2 เป็นการตั้งค่า Yii Framework เพื่อให้สามารถ Connect กับ Social Network ต่างๆ ได้ และทำการแสดงข้อมูลเมื่อเชื่อมต่อได้
ติดตั้ง AuthClient
ทำการติดตั้ง AuthClient โดยพิมพ์คำสั่ง ใน Project ดังนี้
composer require --prefer-dist yiisoft/yii2-authclient
เปิดการใช้งาน urlManager
เปิดการใช้งาน urlManager สำหรับใช้งาน Pretty URL เช่น http://yii2-social.dev/site/auth เป็นต้น โดยเปิดไฟล์ frontend/config/main.php
'urlManager' => [
            'enablePrettyUrl' => true,
            'showScriptName' => false,
            'rules' => [
            ],
        ],
เพิ่มไฟล์ .htaccess ใน frontend/web ดังนี้
RewriteEngine on
# if a directory or file exists, use it directly
RewriteCond %{REQUEST_FILENAME} !-f
RewriteCond %{REQUEST_FILENAME} !-d

# otherwise forward it to index.php
RewriteRule . index.php
ตั้งค่า auth ใน SiteController.php
ทำการตั้งค่า action โดยเพิ่ม auth เพื่อรองรับ Callback ดังนี้
public function actions()
    {
        return [
            'error' => [
                'class' => 'yii\web\ErrorAction',
            ],
            'captcha' => [
                'class' => 'yii\captcha\CaptchaAction',
                'fixedVerifyCode' => YII_ENV_TEST ? 'testme' : null,
            ],
            //เพิ่ม auth
            'auth' => [
                'class' => 'yii\authclient\AuthAction',
                'successCallback' => [$this, 'oAuthSuccess'],
            ],
        ];
    }
จากนั้นเพิ่ม action oAuthSuccess เพื่อประมวลผลข้อมูล ในที่นี้เป็นการทดสอบแสดงผลข้อมูลหลังการเชื่อมต่อสมบูรณ์
public function oAuthSuccess($client) {
        // get user data from client
        $userAttributes = $client->getUserAttributes();
        echo '<pre>';
        var_dump($userAttributes);
        echo '</pre>';
        die();
    }
ตั้งค่าการเชื่อมต่อ Facebook
เพิ่มการตั้งค่าส่วน component ใน frontend/config/main.php ดังนี้
'components' => [
    //...
    'authClientCollection' => [
        'class' => 'yii\authclient\Collection',
        'clients' => [
            'facebook' => [
                'class' => 'yii\authclient\clients\Facebook',
                'clientId' => 'facebook_client_id',
                'clientSecret' => 'facebook_client_secret',
            ],
        ],
    ]
    //...
]
เพิ่ม clientId และ clientSecret
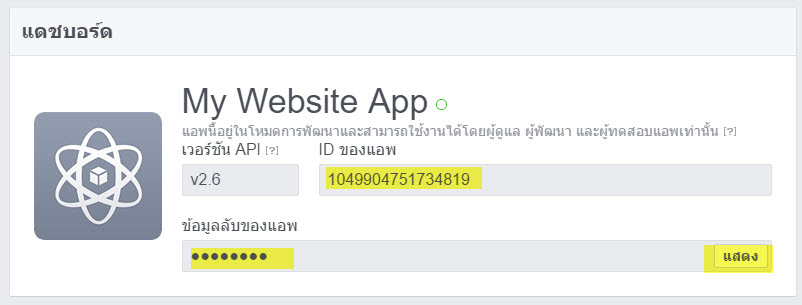
สำหรับ ข้อมูลลับของแอพ ให้กดปุ่ม แสดง แล้วใส่รหัสผ่าน Facebook ของคุณจึงจะปรากฎตัวอักษร จากนั้นนำ ID ของแอพมาใส่ใน facebook_client_id และข้อมูลลับของแอพใส่ใน facebook_client_secret
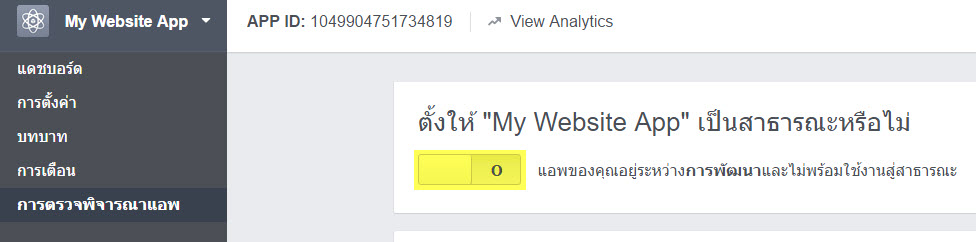
ทำการเผยแพร่แอพเพื่อให้สามารถเข้าใช้งานได้
ตั้งค่าการเชื่อมต่อ Twitter
เพิ่มการตั้งค่าส่วน component ใน frontend/config/main.php ดังนี้
'components' => [
        'authClientCollection' => [
            'class' => 'yii\authclient\Collection',
            'clients' => [
                'facebook' => [
                    'class' => 'yii\authclient\clients\Facebook',
                    'clientId' => 'facebook_client_id',
                    'clientSecret' => 'facebook_client_secret',
                ],
                'twitter' => [
                    'class' => 'yii\authclient\clients\Twitter',
                    'consumerKey' => 'twitter_consumer_key',
                    'consumerSecret' => 'twitter_consumer_secret',
                ],
            ],
        ],
//...
ตั้งค่า twitter_consumer_key และ twitter_consumer_secret ดังนี้
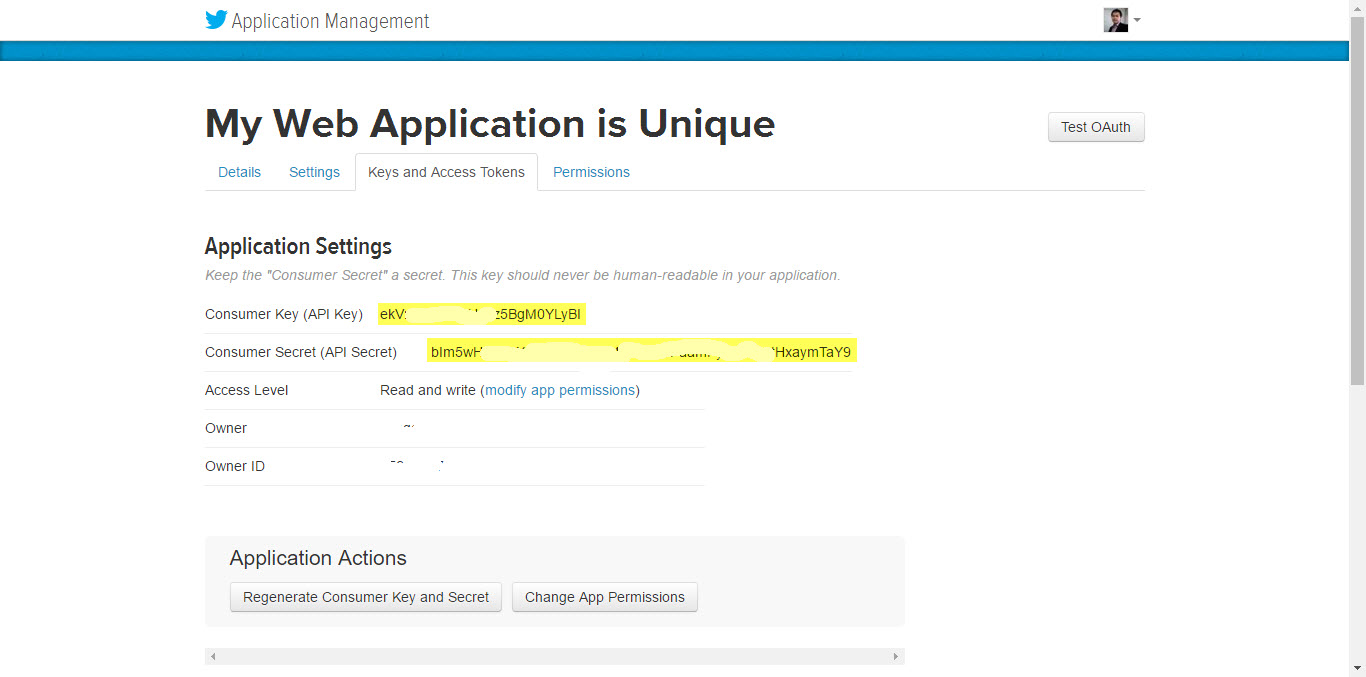 นำ Consumer Key (API Key) ใส่แทน twitter_consumer_key และ Consumer Secret (API Secret) ใส่แทน twitter_consumer_secret
ตั้งค่าการเชื่อมต่อ Google+
เพิ่มการตั้งค่าส่วน component ใน frontend/config/main.php ดังนี้
'components' => [
        'authClientCollection' => [
            'class' => 'yii\authclient\Collection',
            'clients' => [
                'facebook' => [
                    'class' => 'yii\authclient\clients\Facebook',
                    'clientId' => 'facebook_client_id',
                    'clientSecret' => 'facebook_client_secret',
                ],
                'twitter' => [
                    'class' => 'yii\authclient\clients\Twitter',
                    'consumerKey' => 'twitter_consumer_key',
                    'consumerSecret' => 'twitter_consumer_secret',
                ],
                'google' => [
                    'class' => 'yii\authclient\clients\GoogleOAuth',
                    'clientId' => 'google_client_id',
                    'clientSecret' => 'google_client_secret',
                ],
            ],
        ],
//...
ตั้งค่า google_client_id และ google_client_secret ดังนี้
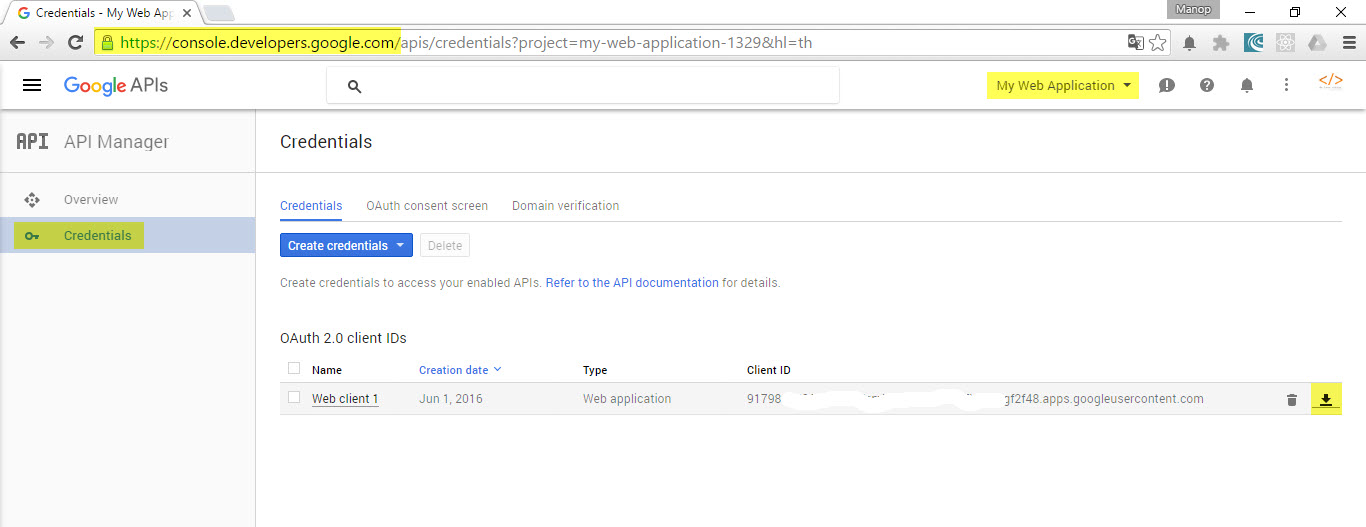
ทำการ Download Google Plus Key เพื่อนำมาตั้งค่า จะได้ไฟล์ .json ซึ่งมีข้อมูลที่สำคัญคือ client_id และ client_secret ให้นำ client_id มาใส่ใน google_client_id และ client_secret มาใส่ใน google_client_secret
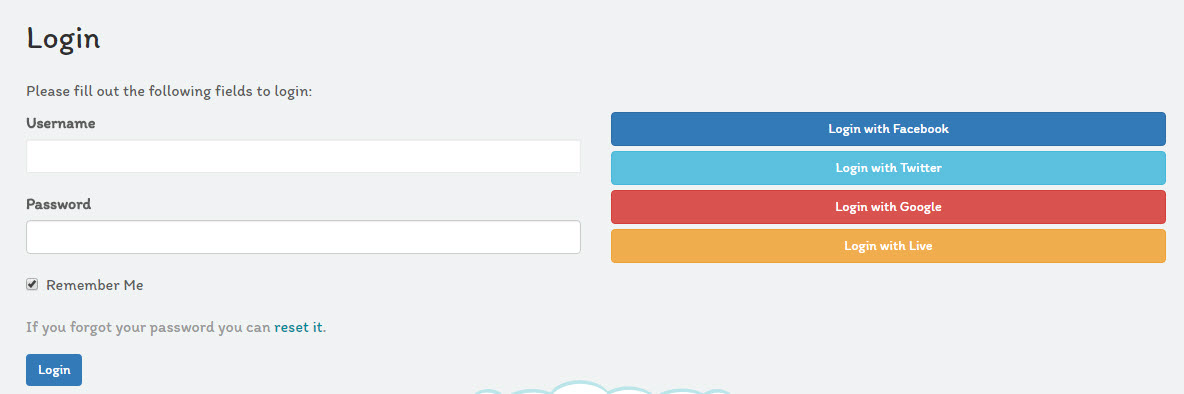
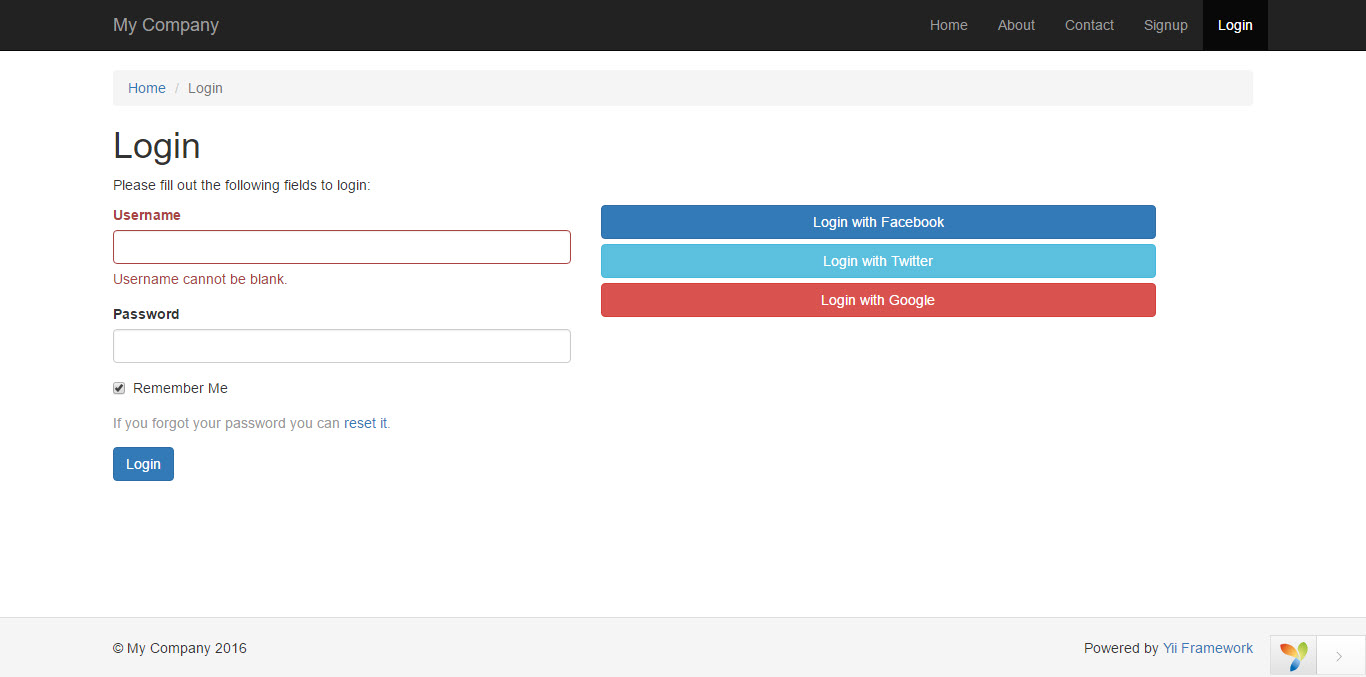
เพิ่มปุ่มในหน้า views/site/login.php
แก้ไขหน้า login เพื่อเพิ่มปุ่มในการ Connect
<?php

/* @var $this yii\web\View */
/* @var $form yii\bootstrap\ActiveForm */
/* @var $model \common\models\LoginForm */

use yii\helpers\Html;
use yii\bootstrap\ActiveForm;
use yii\authclient\widgets\AuthChoice;

$this->title = 'Login';
$this->params['breadcrumbs'][] = $this->title;
?>
<div class="site-login">
    <h1><?= Html::encode($this->title) ?></h1>

    <p>Please fill out the following fields to login:</p>

    <div class="row">
        <div class="col-lg-5">
            <?php $form = ActiveForm::begin(['id' => 'login-form']); ?>

                <?= $form->field($model, 'username')->textInput(['autofocus' => true]) ?>

                <?= $form->field($model, 'password')->passwordInput() ?>

                <?= $form->field($model, 'rememberMe')->checkbox() ?>

                <div style="color:#999;margin:1em 0">
                    If you forgot your password you can <?= Html::a('reset it', ['site/request-password-reset']) ?>.
                </div>

                <div class="form-group">
                    <?= Html::submitButton('Login', ['class' => 'btn btn-primary', 'name' => 'login-button']) ?>
                </div>

            <?php ActiveForm::end(); ?>
        </div>
        <div class="col-md-6 text-center login_social">
        <?php $authAuthChoice = AuthChoice::begin([
                'baseAuthUrl' => ['site/auth']
            ]); ?>

            <?php foreach ($authAuthChoice->getClients() as $client): ?>
                <?php
                switch ($client->getName()){
                    case 'facebook':
                        $class = 'primary';
                        break;
                    case 'twitter':
                        $class = 'info';
                        break;
                    case 'google':
                        $class = 'danger';
                        break;
                    case 'live':
                        $class = 'warning';
                        break;

                }

                $authAuthChoice->clientLink($client, 'Login with '.ucfirst($client->getName()), ['class' => 'btn btn-'.$class.' btn-block']) ?>
            <?php endforeach; ?>

        <?php AuthChoice::end(); ?>
        </div>
    </div>
</div>
ทดสอบโดยการเข้า URL http://yii2-social.dev/site/login
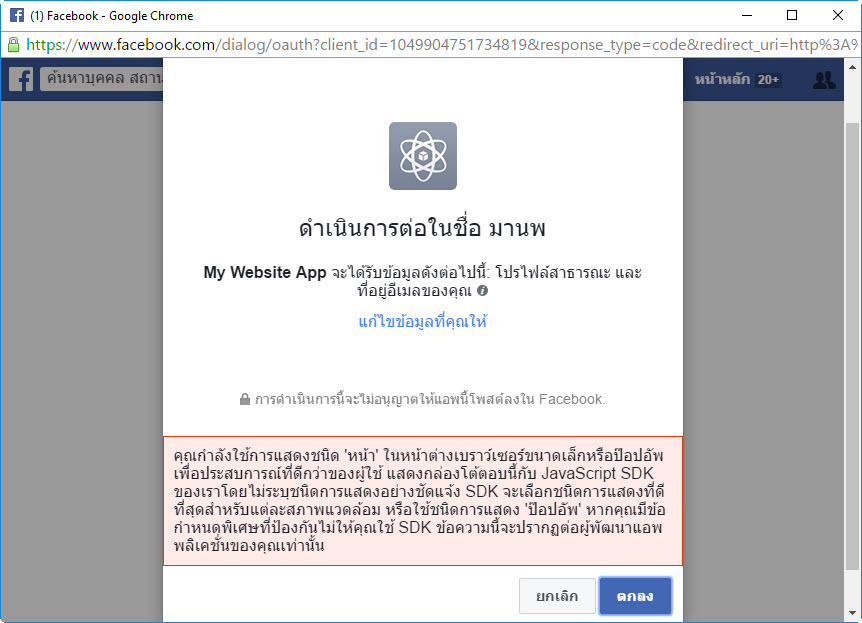
ทดสอบการเชื่อมต่อ Facebook
ทำการทดสอบการเชื่อมต่อโดยกดปุ่ม Login with Facebook จะปรากฏหน้าสำหรับการเชื่อมต่อดังนี้
จะปรากฎข้อมูลกลับมาลักษณะนี้
array(3) {
  ["name"]=>
  string(34) "มานพ กองอุ่น"
  ["email"]=>
  string(19) "kongoon@hotmail.com"
  ["id"]=>
  string(17) "1xxxxxxxxxxxxx"
}
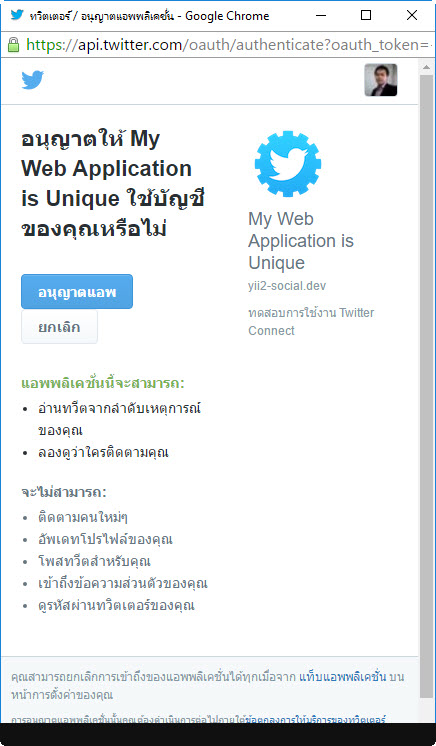
ทดสอบการเชื่อมต่อ Twitter
ทำการทดสอบการเชื่อมต่อโดยกดปุ่ม Login with Twitter จะปรากฏหน้าสำหรับการเชื่อมต่อดังนี้
เมื่อกดปุ่ม อนุญาตแอพ จะปรากฎข้อมูลลักษณะดังนี้
array(42) {
  ["id"]=>
  int(xxxxxxx)
  ["id_str"]=>
  string(8) "xxxxxx"
  ["name"]=>
  string(13) "Manop Kongoon"
  ["screen_name"]=>
  string(7) "kongoon"
  ["location"]=>
  string(8) "Thailand"
  ["description"]=>
  string(37) "I'm a web designer and web programmer"
  ["url"]=>
  string(22) "http://t.co/KmjzUjGknY"
  ["entities"]=> .......
......
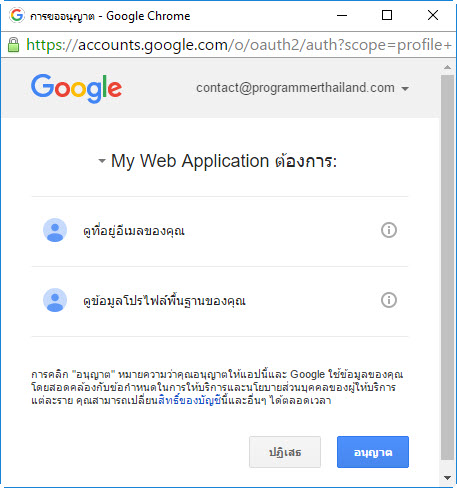
ทดสอบการเชื่อมต่อ Google
ทำการทดสอบการเชื่อมต่อโดยกดปุ่ม Login with Google จะปรากฏหน้าสำหรับการเชื่อมต่อดังนี้

จะปรากฎการขออนุญาตการเข้าถึง
เลือก Account ของคุณจากนั้นจะปรากฎข้อมูลลักษณะดังนี้
array(16) {
  ["kind"]=>
  string(11) "plus#person"
  ["etag"]=>
  string(57) ""xw0en60W6-NurXn4VBU-CMjSPEw/xxxxxxx""
  ["gender"]=>
  string(4) "male"
  ["emails"]=>
  array(1) {
    [0]=>
    array(2) {
      ["value"]=>
      string(30) "contact@programmerthailand.com"
      ["type"]=>
      string(7) "account"
    }
  }
  ["objectType"]=>
  string(6) "person"
  ["id"]=>
  string(21) "xxxxxxxxx"
  ["displayName"]=>
  string(19) "Programmer Thailand"
  ["name"]=>.....
.....
เพียงเท่านี้ก็สามารถเชื่อมต่อ Social Network ผ่าน Application ที่เราได้สร้างขึ้นมาเรียบร้อยแล้ว ในขั้นตอนต่อไปเรามาสร้างตารางในการเก็บค่าการเชื่อมต่อ และให้สามารถเชื่อมต่อกับ Yii Framework ได้สมบูรณ์แบบมากยิ่งขึ้น ติดตามต่อได้ใน Part 3 นะครับ


ความคิดเห็น