สำหรับหลายๆ เว็บไซต์ที่เราเคยเห็นหรือเคยใช้งานจะมีปุ่ม Login with Facebook สงสัยไหมครับว่ามันทำงานอย่างไร หรือมันมีขั้นตอนในการสร้างอย่างไร ไปดูทีละขั้นตอนกันเลยครับ
สร้าง Facebook App
สร้าง Facebook App เพื่อใช้ในการตั้งค่าระดับการเข้าถึงว่าต้องการให้เว็บเราใช้ข้อมูลอะไรของ Facebook User ได้ รวมไปถึงการเก็บสถิติการใช้งาน ต่างๆ อีกด้วย ดูวิธีการสร้างดังนี้ เข้า URL (Login เข้า Facebook ก่อนนะ)
https://developers.facebook.com/
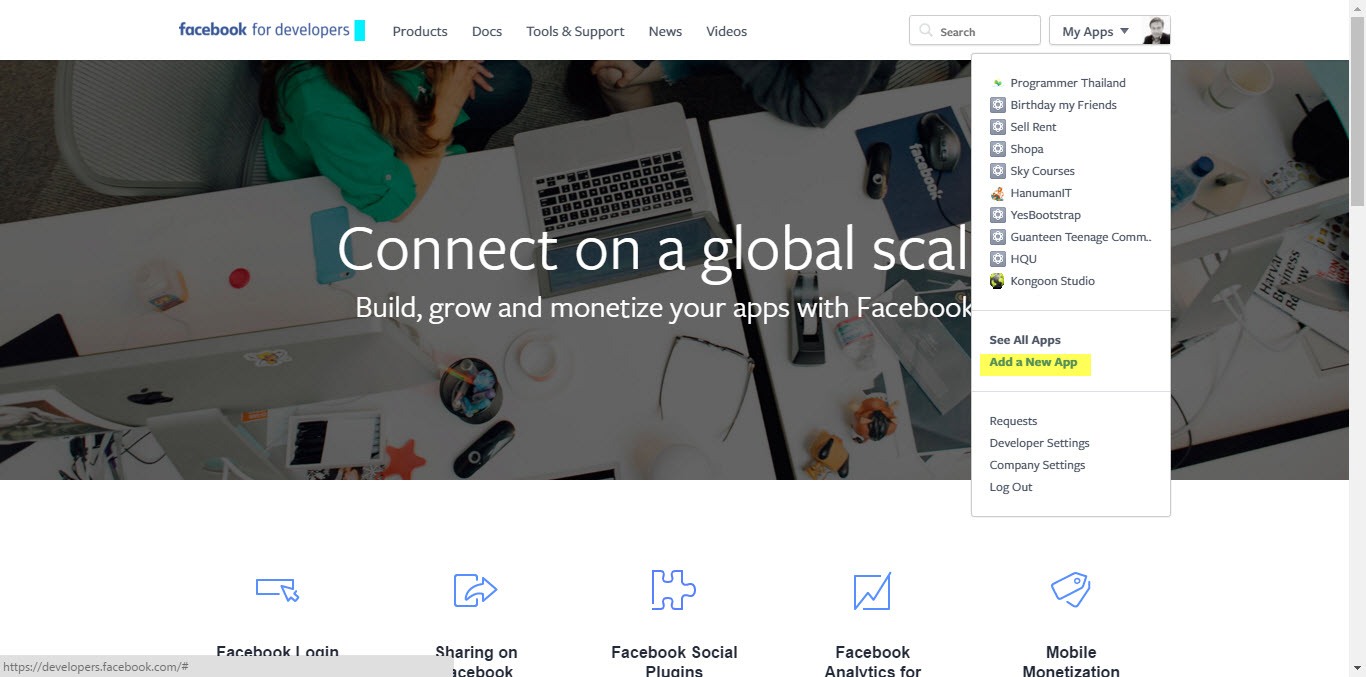
จากนั้นก็คลิกที่ตรงรูปของเราด้านขวาบนเลือก Add a New App
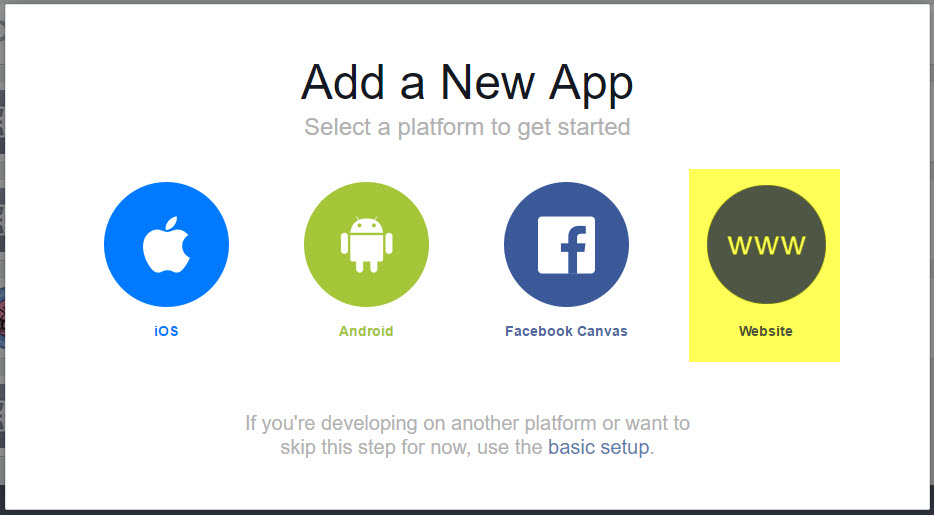
เลือกชนิดแบบ Website
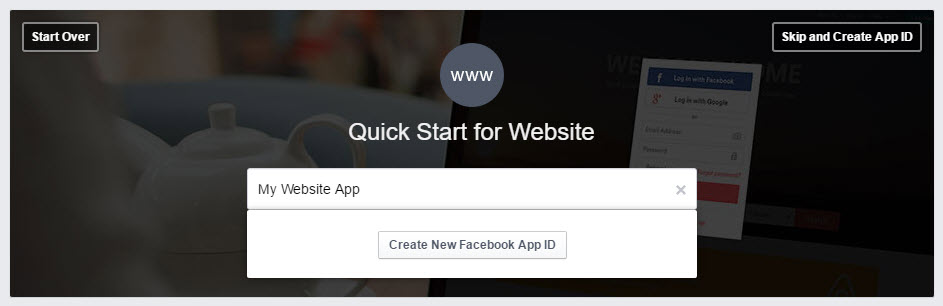
กำหนดชื่อ Facebook App และกดปุ่ม Create New Facebook App ID
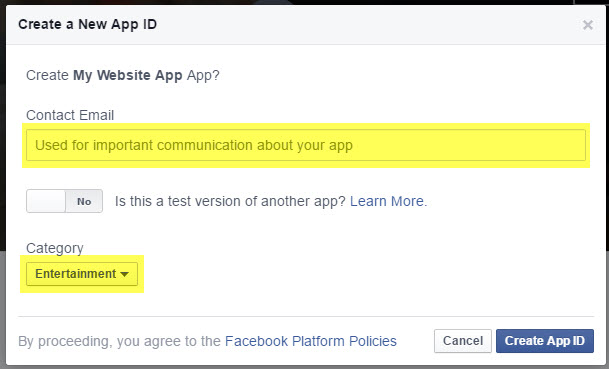
ใส่ Email และ เลือก หมวดหมู่ของ App และกดปุ่ม Create App ID
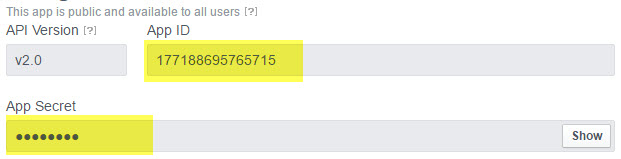
เมื่อทำตามขั้นตอนจะได้ App ID และ App Secret
ติดตั้งและตั้งค่า AuthClient Extension for Yii 2
ทำการติดตั้ง AuthClient Extension for Yii 2 โดยเรียกคำสั่ง
composer require --prefer-dist yiisoft/yii2-authclient
เปิดไฟล์ frontend/config/main.php เพื่อตั้งค่า authclient ดังนี้
frontend/config/main.php
'components' => [
//...
        'authClientCollection' => [
            'class' => 'yii\authclient\Collection',
            'clients' => [
                'facebook' => [
                    'class' => 'yii\authclient\clients\Facebook',
                    'clientId' => 'YOUR_APP_ID',
                    'clientSecret' => 'YOUR_APP_SECRET',
                ],
            ],
        ],
//...
],
แก้ไข SiteController.php
เปิดไฟล์ frontend/controllers/SiteController.php เพื่อแก้ไขส่วน action โดยเพิ่ม index auth เข้าไป
frontend/controllers/SiteController.php
    public function actions()
    {
        return [
            'error' => [
                'class' => 'yii\web\ErrorAction',
            ],
            'captcha' => [
                'class' => 'yii\captcha\CaptchaAction',
                'fixedVerifyCode' => YII_ENV_TEST ? 'testme' : null,
            ],
            //...
            'auth' => [
                'class' => 'yii\authclient\AuthAction',
                'successCallback' => [$this, 'oAuthSuccess'],
            ],
            //...
        ];
    }
จะเห็นว่าในส่วนของ successCallback นั้นเมื่อ Login ใน Facebook ได้แล้วให้ Callback มาที่ action oAuthSuccess ดังนั้นเราก็จะเขียน actionOAuthSuccess() เพื่อรองรับและประมวลผลกับข้อมูล
ตารางเก็บข้อมูล user ใช้ค่าเริ่มต้นจากการ migrate
ตารางเก็บข้อมูล profile มี field user_id, firstname และ lastname
public function oAuthSuccess($client) {
        // get user data from client
        $userAttributes = $client->getUserAttributes();
        //var_dump($userAttributes);
        //exit();
        if(empty($userAttributes['email'])){
            Yii::$app->session->setFlash('error', 'กรุณากด Allow Access ใน Facebook เพื่อใช้งาน Facebook Login');
            return $this->redirect('/site/login');
        }
        $user = User::findOne(['email' => $userAttributes['email']]);

        if($user){//ถ้ามี user ในระบบแล้ว
            //echo 'user email';
            if($user->status != User::STATUS_ACTIVE){//ถ้าสถานะไม่ active ให้ active
                $user->status = User::STATUS_ACTIVE;
                $user->save();
            }
            $profile = Profile::find()->where(['user_id' => $user->id])->one();
            if(!$profile){// ถ้าไม่มี profile ให้สร้างใหม่
                $name = explode(" ", $userAttributes['name']);// แยกชื่อ นามสกุล

                $pf = new Profile();
                $pf->firstname = $name[0];
                $pf->lastname = $name[1];
                $pf->save();
            }

            Yii::$app->getUser()->login($user);
        }else{//ถ้าไม่มี user ในระบบ
            //echo 'none user';
            //$generate = Yii::$app->security->generateRandomString(10);
            $uname = explode("@", $userAttributes['email']);// แยกอีเมลล์ด้วย @
            $getuser = User::findOne(['username' => $uname[0]]);
            if($getuser){//มี username จาก username ที่ได้จาก email
                //echo 'exit user from username';
                $rand = rand(10, 99);
                $username = $uname[0].$rand;
            }else{
                //echo 'none user from username';
                $username = $uname[0];
            }
            //echo $username;
            $new_user = new User();
            $new_user->username = $username;
            $new_user->auth_key = Yii::$app->security->generateRandomString();
            $new_user->password_hash = Yii::$app->security->generatePasswordHash($username);
            $new_user->email = $userAttributes['email'];
            $new_user->status = User::STATUS_ACTIVE;

            if($new_user->save()){
                //echo 'save user';
                $name = explode(" ", $userAttributes['name']);// แยกชื่อ นามสกุล
                $new_profile = new Profile();
                $new_profile->user_id = $new_user->id;
                $new_profile->firstname = $name[0];
                $new_profile->lastname = $name[1];
                $new_profile->save());
                Yii::$app->getUser()->login($new_user);

            }else{
                //echo 'not save user';
            }

        }
        //exit();
        // do some thing with user data. for example with $userAttributes['email']
    }
แก้ไข login.php
ทำการแก้ไข frontend/views/site/login.php เพื่อแสดงผลปุ่มสำหรับ login
<?php $authAuthChoice = AuthChoice::begin([
'baseAuthUrl' => ['site/auth']
]); ?>

<?php foreach ($authAuthChoice->getClients() as $client): ?>
    <?php $authAuthChoice->clientLink($client, 'Login with Facebook', ['class' => 'btn btn-primary']) ?>
<?php endforeach; ?>

<?php AuthChoice::end(); ?>


ความคิดเห็น